
What hand tools do I need to start woodworking? - Part 1: Marking and measuring

You may have heard the old adage ‘measure twice and cut once’ – while it rings just as true in our workshop today, careful measuring requires us to have the proper tools to find distances, angles, relationships between multiple pieces, and to mark those accurately and clearly.

Pencil
It may seem obvious, but few tools are more often reached for in our shop than the trusty pencil and its ever-near neighbours in a sharpener and rubber. A box of good HB or 2B pencils will last you a long time, and provide a nice dark mark on any timber or other material. Pencil lead has the additional benefits of being easily removeable, but also of having a slight sheen so you can pick out the marks under a light on extra dark material.
When using a pencil, especially on sanded or nearly-finished work, make sure to press down lightly, as the point of the lead can cause the surface to not just scribe but indent! It’s also always important to remember that your pencil line, like any other marking, has a thickness of its own. We always mark out work so that the edge of the pencil line is the cut line, rather than the middle of the pencil line.
Ruler
A good metal ruler is essential for a great deal of carpentry work, as well as for our sketching and design work. Metal rulers may seem like you don’t get much more bang for the additional expense, but knowing that your straight edge will stay straight even if it’s dropped or dinged provides a peace of mind for marking out work that plastic or timber rules just can’t do.
We have a mix of metric and metric/imperial combo rulers in our shop – it can be helpful to have an imperial ruler on hand in case you’re reading off of a diagram or set of plans from the U.S. or before the mid 20th century!
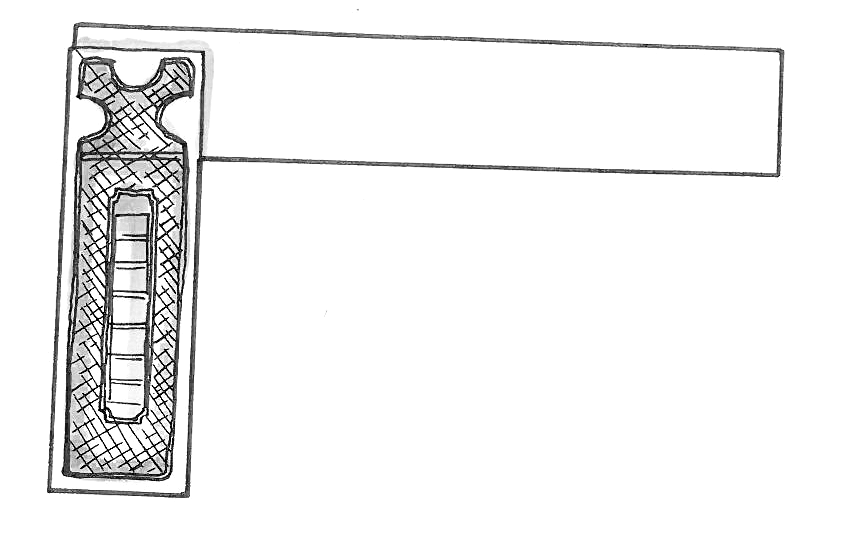
Carpenters Square
A carpenters square is just two straight edges set at a 90º corner – a thicker fence and a thinner blade. The thicker edge can be placed against a range of edges and surfaces with the thin blade providing a clear right angle of the reference surface.
Squares are easy to pick up second hand, but make sure to check that they’re truly a right angle before using them on your work! Place the fence against a flat surface and draw a line along the blade, then flip the whole square over 180º and draw another line on top of the first one. If they’re perfectly aligned you’ve got yourself a true square, but if they start to diverge you may want to find one that’s in better condition.
No matter your work, treat your squares carefully – once a square has gone out of true it can be tricky to correct it back to 90º.

Marking knife
Sometimes a pencil line just won’t be clear enough, or you want your marked line to actually sever the wood fibers to get a cleaner edge to your work. Marking knives come in all varieties, from the (literally) gilded and grand, to old butter knives that have been cut on an angle and sharpened on a rough stone.
A good marking knife will have one side flat and the other side with the knife bevel so you can run the flat edge along your ruler/measuring tool and get as accurate a line as possible. However, this does mean you will need to turn the knife around depending on where you’re marking. As with any sharpened tools, making or fitting a cover for the blade edge will not only keep you safe from rooting around in your toolbox, but keep your honed edge nice and sharp!
Measuring tape
Sometimes a ruler just isn’t going to cut it, and the measuring tape is ready to step in and get its hands dirty. Modern measuring tapes are accurate, claer, and extremely compact, and are available for very little money from any hardware store. If you’re doing fine joinery or precise work, it can be good to test your tape measure against your other measuring tools (such as a ruler) to make sure that they’re getting the same exact dimensions and so you don’t end up getting frustrated that the numbers aren’t adding up!
One way to avoid this frustration is to make sure every measurement for a single project is done with the same tool, whether that’s a tape, a ruler, or a gauge, so any imprecision is replicated across the whole project evenly. Ideally however, you can check your tools to ensure they’re measuring true.

Sliding gauge or mortise gauge, and their helpful cousin, the pencil gauge
A marking gauge or mortise gauge have a similar construction – a timber beam that slides through the center of the stock and has a small cutting pin or blade that is pulled across the timber surface – the main difference being that a mortise gauge has two pins that are spaced to be the size of a mortise.
Marking gauges may seem old fashioned, but their ability to lock in place and replicate a distance across multiple parts of a project, or even multiple projects, allows for fast and accurate marking out. When working on a custom project, we may have 3 or 4 gauges out at once, all set to different dimensions, ready to mark each different part as required.
A pencil gauge is very similar to these gauges, but has a hole large enough to fit a pencil in the beam, rather than a blade. Few tools can as quickly mark the distance of a round-over on your work as easily as a pencil gauge.
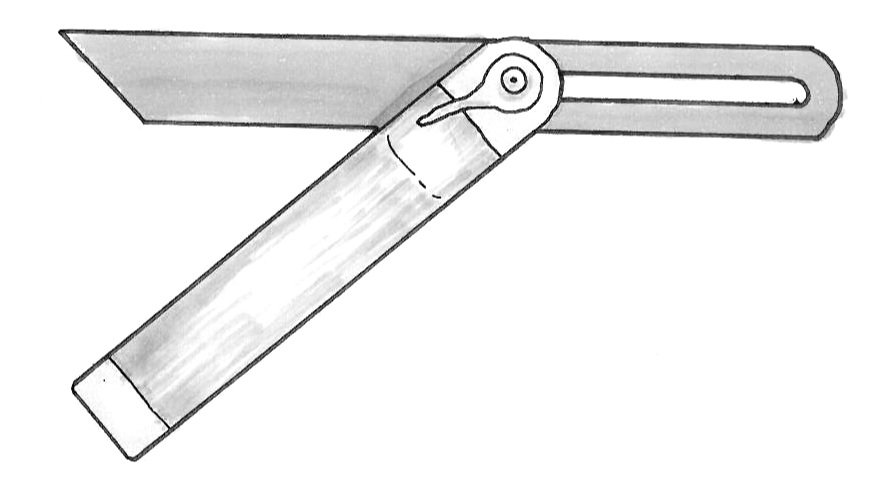
Carpenters angle/sliding bevel
All the measuring tools above have to do with marking straight and often parallel angles, but sometimes you need to mark and replicate a specific angle across your work. The carpenters angle is perfect for this, with the fence and blade locking in place to allow easy transferring of an angle across multiple work pieces. These tools are also super useful for setting up tools or jigs, such as a table saw blade or drill press, so that they match the required angle from a work piece, and the long blade allow for a high degree of accuracy.
These tools are definitely not everything you could want for measuring and marking, but having a set of these on hand will make short work of almost any measuring work you set your mind to! If you have any tools that we missed and you’d love to see discussed, let us know. We’ll be producing a series of blogs in the What hand tools do I need to start woodworking? series, so stay tuned for more!
If you want to find out more about measuring and marking, or want to get some hands-on experience, come and join us for one of our Saw Bench, Step Stool or 3-legged-stool courses – you can find out more about these courses here.